

How To Install A Barrel On An Ar 15
Building an AR-xv upper piece by slice? Upgrading your barrel? Mayhap you're swapping 5.56 or .223 for 300 Coma like nosotros are today. This guide illustrates how to install the AR-xv barrel and gas system. Total fourth dimension required is approximately 30 minutes to one hour, and some basic tools are required or recommended. Let's begin!
Install Tools Required
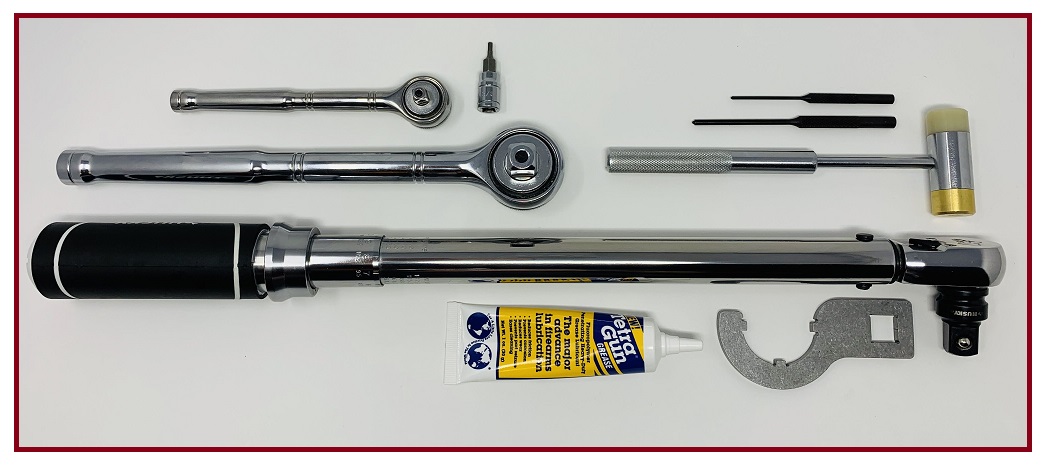
- Vise: Not pictured, you lot'll demand a bench-elevation vise to secure the upper receiver while yous tighten the barrel nut.
- Upper Receiver Vise Clamp: Not pictured,yous'll also need an upper receiver vise block clamp to preclude cracking or damaging the receiver in the vise.
- Torque Wrench: You'll need a torque wrench with a 3/eight" or 1/two" drive to properly tighten your butt nut. The longer the wrench handle, the better. If your barrel doesn't provide torque specs, refer to U.Due south Mil-Spec. The M4 Armorer's Transmission says to torque your barrel nut to 30 to 80 ft-lbs. (folio 155). Realistically, xl to 50 ft-lbs. is all-time. Near barrel manufacturers suggest this, too.
- Barrel Nut Wrench: Required for installing and tightening the butt nut with the torque wrench. Well-nigh barrels ship with one. If your barrel doesn't include one, be sure the one you buy has the right torque wrench drive attachment size (over again, 3/8" or 1/2").
- 3/32" and five/32" Punches: Your gas cake will likely include 2 to iii ringlet pins: One or two for securing information technology to the barrel, and one for securing the tube within. The whorl pins typically measure 3/32" and 5/32". Get the right punches.
- Gas Tube Alignment Tool: Optional. The alignment tool helps to ensure the gas tube interfaces with the commodities carrier group properly inside the upper receiver once installed.
The Wheeler AR Armorer's Essentials Kit includes the tools listed above.
- Breaker bar or Ratchet: You'll demand to tighten and loosen the barrel nut (iii) times to properly seat the threads. You should never break a nut loose with a torque wrench. Instead, grab a breaker bar or ratchet to do so.
- Gunsmithing Hammer: Those punches are a PITA in the install, and if you've ever installed a lower parts kit, you already know. To brand information technology easy, grab a brass/polymer-head gunsmithing hammer. This will forbid damage to your barrel while y'all tap the pins in.
- Set of Allen Keys: Your gas block also probably includes (2) Allen-head set screws. These screws are meant to concord the gas block in place while you install the roll pins. Grab a ready of Allen Keys to tighten the set screws.
- Grease for Barrel Nut: Some say grease is optional. Information technology is required. When y'all tighten the barrel nut three times, you'll wish you lot had grease. Not using grease is a bad thought, as you lot can gall or strip the threads.
New Install Video Available!
In addition to our detailed written guide here, we've at present got an even more detailed instructional video that follows these instructions! Watch it beneath for further assistance and clarity on how to properly torque your barrel nut.
"Which barrel nut grease is safe/best?"
There seems to exist a lot of research about which grease one should utilize to install their AR-15 butt. Keep it uncomplicated folks: U.Southward. Mil-Spec says to utilize Molybdenum Disulfide grease (page 143). The official proper noun is Aeroshell 33MS. Any loftier-temperature, moly, or lithium grease that does not have metal additives is safe to utilize. Do not use grease that includes graphite, as graphite can fatigue the aluminum threads on the upper receiver. We're using simple Tetra Gun Grease.
AR-15 Parts Required
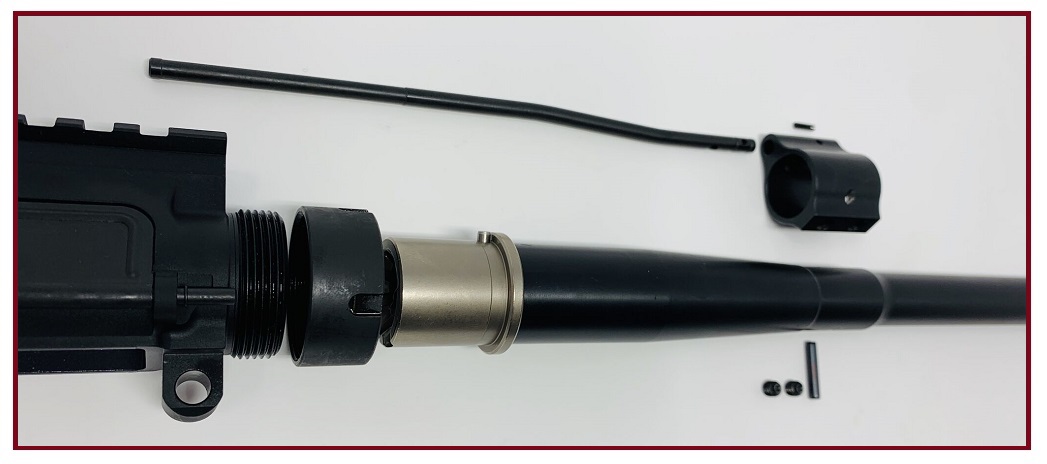
- Barrel (w/ Extension): Near all AR-fifteen barrels ship with the extension already threaded and torqued. The headspace must be perfect, the index pin must align with the gas port perfectly, and torque requirements are very high, well over 100 ft-lbs. We don't recommend trying to install the extension onto the barrel yourself. We're putting together a 300 Blackout pistol upper for this install, but the installation steps and torque specs are the exact aforementioned if you're building a regular AR-15 rifle or pistol with a 5.56/.223 barrel.
- Barrel Nut: The well-nigh important role in this install, the barrel nut secures the barrel to the upper receiver. Whether you're using a classic 2-piece A2 or Picatinny rail, or a free-float unit of measurement, the butt nut also acts every bit the mounting point for your handguard.
- Gas Block: Nosotros're using the most popular gas block you lot'll find today, a depression-profile cake designed for a free-float runway. The "A2-style" FSB found on M4s or M16s is slightly different, and will not be covered in this install guide.
- Block Roll Pins: The roll pins secure the gas cake to the barrel, and secure the gas tube to the block.
- Block Set Screws: Used for tightening the block to the barrel and holding information technology in place while you lot secure the block-to-barrel curlicue pin(due south).
- Gas Tube: Our gas tube is pistol-length to ensure our gun handles subsonic loads reliably, simply your typical AR-15 build will probable use a carbine or mid-length tube. Install steps and parts required are still the same regardless of tube length or caliber.
The Install
Step i: Slide Butt Nut Onto Butt
- Parts:Upper Receiver, Butt, Barrel Nut, *Handguard Attachment.
- Tools: Allen Key or Allen Wrench (for Gas Block Set Screws).
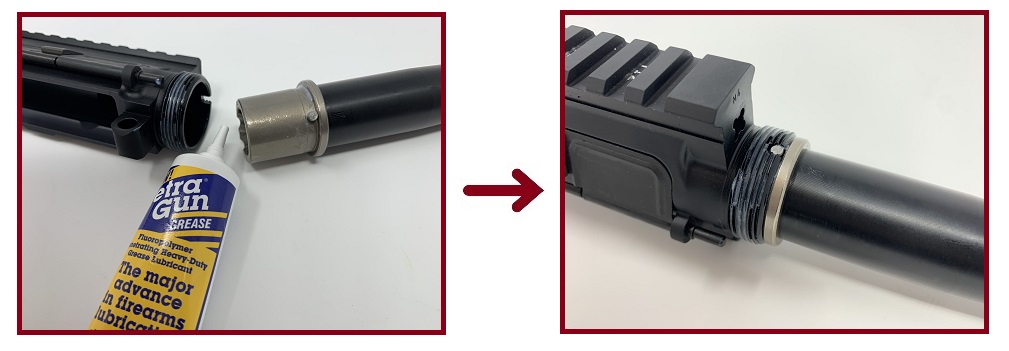
Collect the upper receiver, the barrel and the barrel nut. If your butt arrived with the gas block partially installed via the ready screws, take hold of the advisable Allen key (or wrench and socket) and remove the gas block by removing the fix spiral(s).
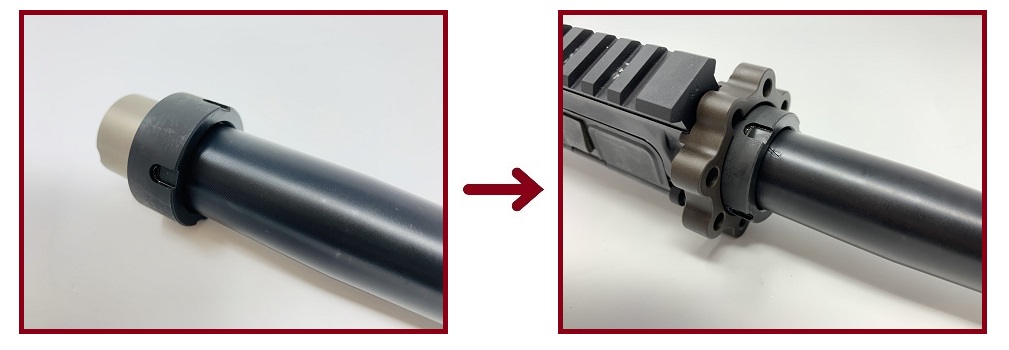
Adjacent, slide the barrel nut onto the barrel, upwardly against the receiver extension. Ensure the grooves of the barrel nut are facing the muzzle. The grooves are what allow the butt nut wrench to capture and tighten the nut via your torque wrench.
*NOTE: You may need to showtime slide your handguard's attachment plate or handguard nut onto the barrel so it rests between the barrel nut and the upper receiver as shown higher up. Refer to your handguard's pedagogy manual. If applicative, ensure the gas tube hole in the handguard mountain or plate aligns with the gas tube hole in the receiver.
Footstep 2: "Flavor", Tighten, and Torque Barrel Nut
- Parts: Barrel Nut.
- Tools: Vise, Receiver Vise Block, Barrel Nut Wrench, Torque Wrench, Grease.
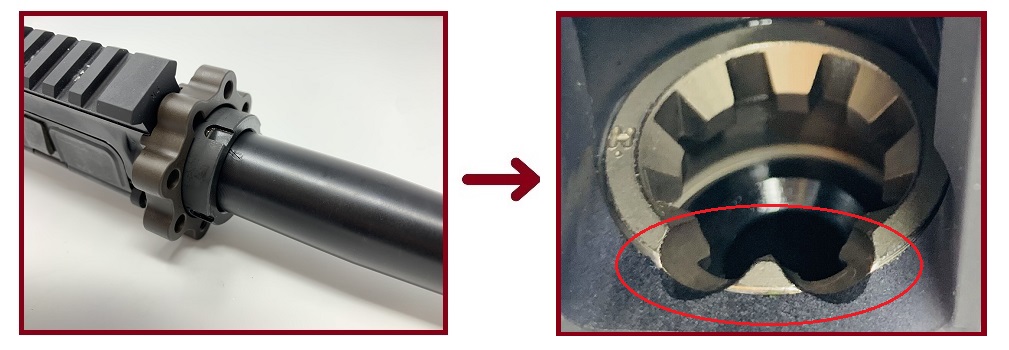
Get-go, apply grease to the receiver'southward barrel nut threads and the exterior of the barrel extension. The extension might exist a tight fit. Seat the extension within the receiver fully, ensuring the alphabetize pin on the extension is aligned and secured inside the cut-out notch in the barrel nut threads.
Side by side, hand-tighten the barrel nut to the receiver'due south threads. Check inside the receiver to confirm the butt extensions's and receiver'due south feed ramps are properly aligned with each other. Ensure your receiver is secured in the vise and vise block clamp. It's imperative the receiver assembly does not flex, twist, or move while torquing the barrel nut. Our receiver is non clamped for the purposes of better analogy.
Do not tighten the nut.
READ ALL Best PRACTICES AND PROCEDURES Beneath BEFORE TIGHTENING!
If you practise not follow these instructions precisely, you volition impairment your torque wrench or nut wrench and fail to attain a proper installation.
Best Practices for Tightening the Nut
- Ensure the butt nut wrench is parallel with the torque wrench's handle. If it is not, torque cannot be properly applied and the correct ft-lbs. will not be accomplished when tightening the nut. The nut wrench could besides warp.
- Reference your barrel'due south manual for advertised ft-lbs. If a specification is not provided, default to 40 to l ft-lbs.
- These steps employ to open-ended wrenches: When tightening the nut, with the wrench's teeth secured to the nut'due south topand side grooves (not underneath), always tighten from the left side of the receiver, in a downward movement. This pulls the wrench'southward teeth into the nut's grooves. Tightening from the correct side of the receiver past pulling up on the wrench tin bend the wrench outward, pulling its teeth out of the grooves, rendering the wrench useless.
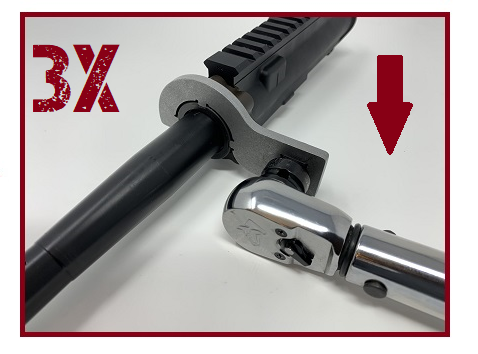
Your setup should look exactly similar the wrenches, nut, and receiver pictured above.
Do NOT TIGHTEN. Keep READING.
Seasoning the Receiver's Threads
The barrel nut is made of steel. The AR-xv receiver's threads are made of aluminum, which is softer. Threading dissimilar metals together nether high torque requires "seasoning" the threads of the softer metal by repeatedly loosening and re-tightening the nut. This ensures the barrel is properly seated and volition not loosen under heat or pressure once torqued a final fourth dimension.
Of import: Exercise not loosen the barrel nut with the torque wrench. This tin can ruin the wrench's scale. Instead, utilize a standard ratchet or breaker bar to loosen the nut. Ensure the breaker bar/ratchet handle and nut wrench are parallel when loosening.
IMPORTANT: When loosening the barrel nut, install the nut wrench underneath the barrel, in the bottom and side grooves of the nut. Pull up from the left side of the receiver. This again pulls the wrench into the nut's grooves rather than away, preventing the nut wrench from warping or bending outward.
NOW, FOLLOW THE STEPS Beneath TO TIGHTEN THE BARREL TO THE RECEIVER:
Ready your torque wrench to the the specified ft-lbs.
- Torque the butt nut with the nut wrench and torque wrench.
- Loosen the nut with either a drive ratchet/breaker bar.
- Back the nut off the threads, and then re-tighten by mitt.
- Re-torque the barrel nut the specified ft-lbs.
Repeat these steps until the barrel nut has been torqued (iii) times.
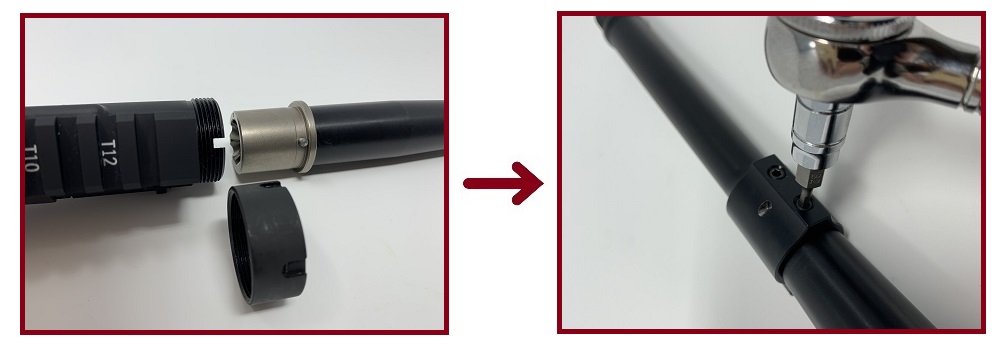
Step 3: Install Gas Block, Gas Tube, & Set Screws
- Parts: Gas Block, Gas Tube, Set Screws.
- Tools: Allen Cardinal or Allen Wrench.
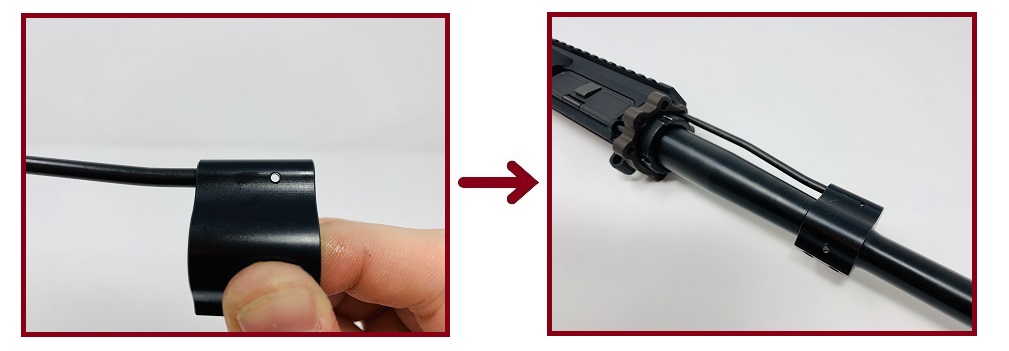
Collect the gas tube, gas cake, and set screws. First, insert the cease of the gas tube with the coil pin pigsty into the gas block. Information technology is a tight fit; lubricant may help. Printing the tube into the block until the pigsty in the tube aligns with the roll pivot hole in the block, as shown left. Slide the gas block onto the butt, and allow the other end of the tube to feed through the gas tube hole (and hole in the handguard attachment, if applicable) into the upper receiver.
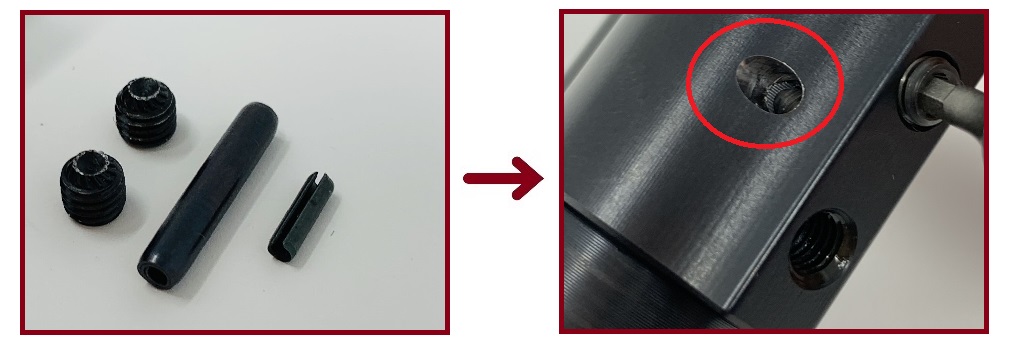
Catch the ready screws from the gas cake hardware and thread them paw-tight into the gas block with the Allen cardinal or Allen wrench, securing the block to the barrel. While doing and then, double-check the roll pin hole for the gas block-to-butt pin is aligned with the cutting-out for the pin in the barrel itself. The hole is circled in red above.
Step four: Check Tube Alignment, Install Gas Block Roll Pin
- Parts: Gas Cake Gyre Pin.
- Tools: 5/32" Punch, Gunsmith Hammer, Gas Tube Alignment Tool or BCG.
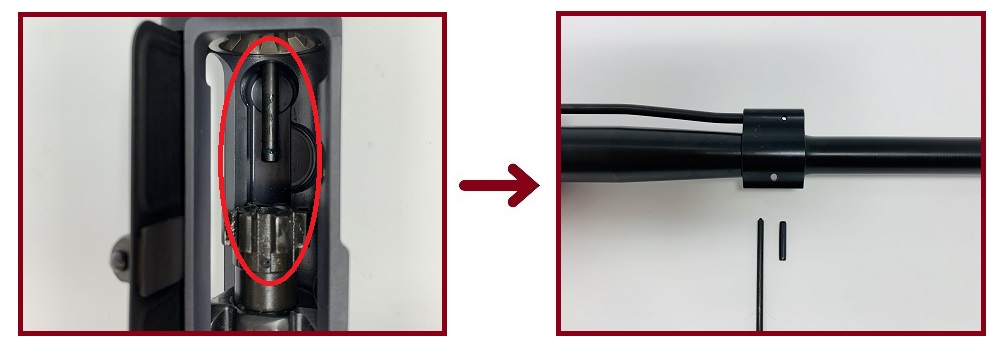
Take hold of the gas cake roll pin and 5/32" punch with gunsmith hammer. Once you seat that gas cake roll pin, it own't comin' out without a fight. Before you begin tapping it into the gas block, double-check alignment of the gas tube with the upper receiver. This can exist accomplished with the Gas Tube Alignment Tool included in the Wheeler Armorer's Kit. Or, you lot tin grab your BCG and charging handle, install the pair into the receiver, and check alignment via the handle and gas key on the carrier.
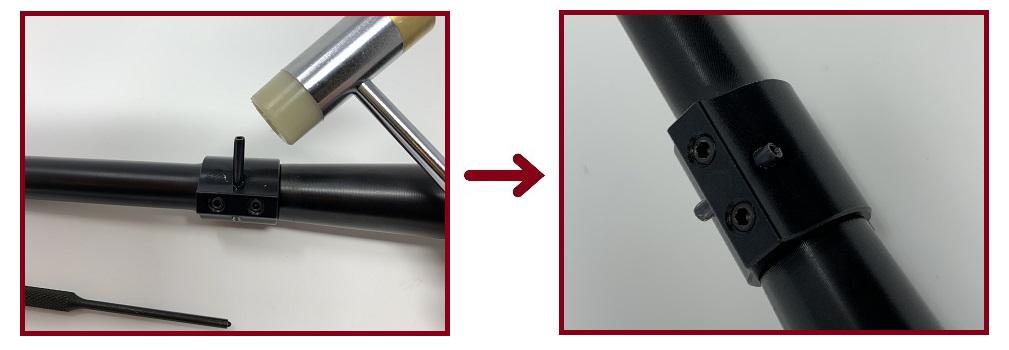
Once you've verified alignment of the gas tube and receiver, y'all may brainstorm tapping the gas block scroll pivot into identify. To foreclose marring the finish on the barrel, seat the pin atop the hole and tap the pin straight with the polymer terminate of your gunsmith hammer. Once partially seated, continue borer the pin into place with the 5/32" punch. The pin is longer than the gas block and barrel cut-out; ensure it protrudes at equal lengths on both sides. of the block.
Pace 5: Insert the Gas Tube Roll Pin
- Parts: Gas Tube Roll Pin.
- Tools: iii/32" Punch, Gunsmith Hammer, Pliers (optional).
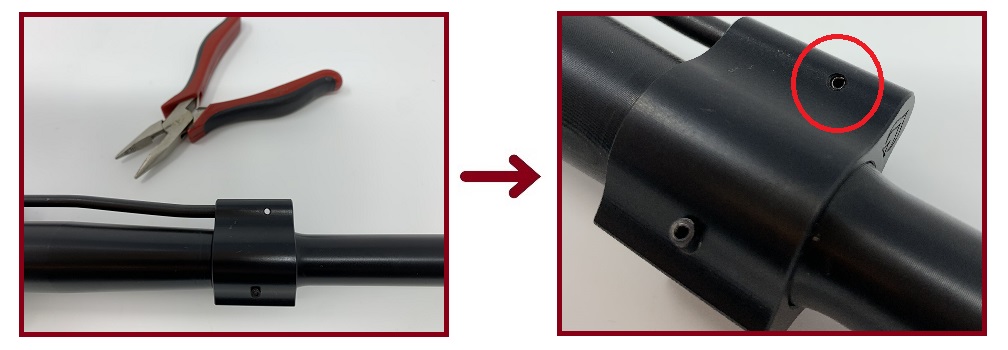
If you lot installed your own LPK in your lower receiver, and then welcome back! The gas tube curlicue pin is about the aforementioned size and width as the bolt catch pin and yeah, information technology tin can be a pain. This time, y'all're installing information technology on a rounded surface. It helps to re-seat your receiver horizontally in your vise for this 1. Collect the 3/32" punch, gunsmith hammer, and roll pin and tap it into identify. Take your time, it will fight you. Once installed, the pivot should be flush on both sides of the gas block.
Your AR-15 Barrel and Gas Arrangement are Installed!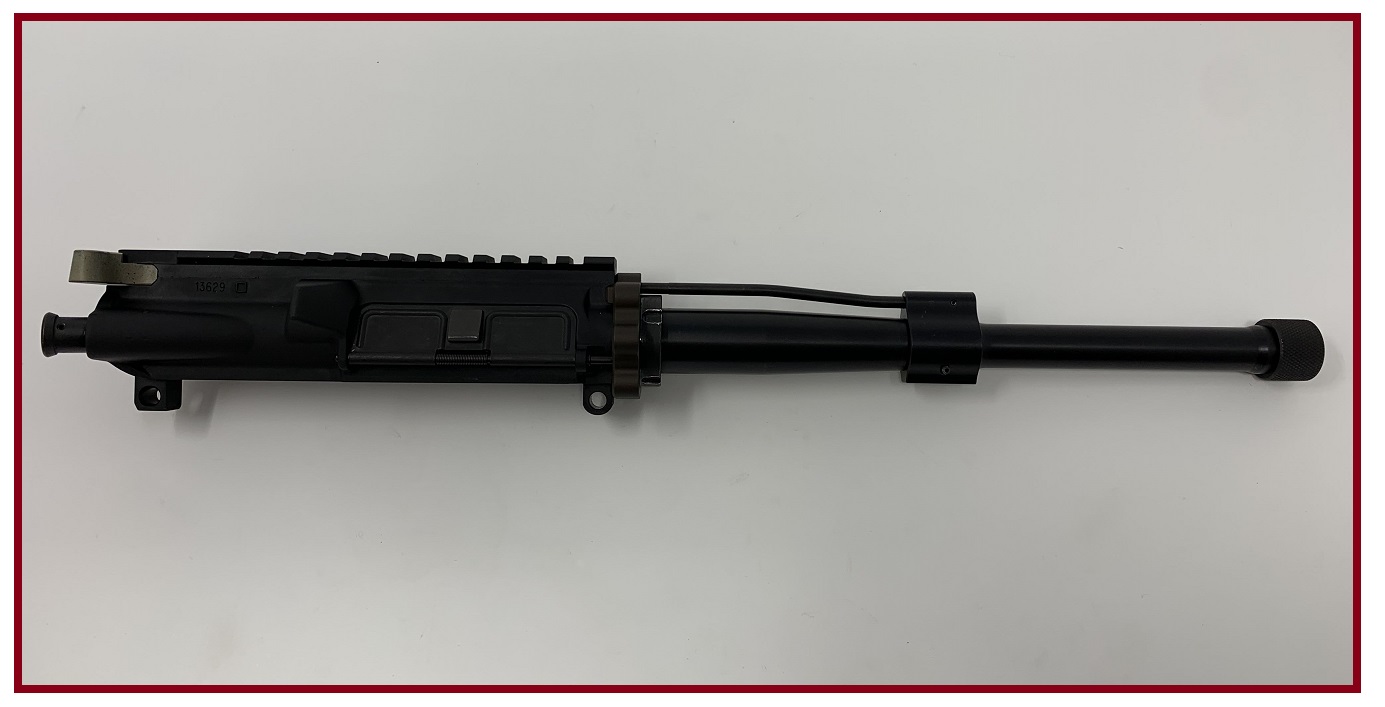
With the gas tube roll pin fully seated, your barrel and gas arrangement install is complete! Perform a functions check of the BCG and charging a concluding fourth dimension to ensure the gas tube is all the same aligned subsequently seating the final roll pin. One time it checks out, you lot may go along with completing the installation of your handguard, eyes, and cage device.
We'll encounter you lot on the range, deadeye.
DISCLAIMER: If you are new to the earth of DIY gun building, you likely take a lot of questions and rightfully so. It'due south an area that has a lot of questions that, without the correct answers, could take some serious implications. At 80-lower.com, we are by no means providing this content on our website to serve as legal advice or legal counsel. We encourage each and every builder to perform their own enquiry around their corresponding Country laws as well as educating themselves on the Federal laws. When performing your own research, please be sure that yous are getting your data from a reliable source.

Source: https://www.80-lower.com/80-lower-blog/how-to-install-an-ar15-barrel-gas-system/
Posted by: fontenotsatereat.blogspot.com
0 Response to "How To Install A Barrel On An Ar 15"
Post a Comment